
Primitive cultures and their means of making bows and arrows have always been an interest of mine. As a young boy, I remember visiting museums throughout the West with my Grandmother, where I had a deep fascination towards the Native American way of life. I always asked my Grandmother where the arrowheads and archery equipment was located. After showing me the bows, arrows, and small “bird points” I always received a well deserved lecture on how they were made and used. My Grandmother had a great appreciation towards the Native people who occupied the lands before, and after European contact, and taught me to have the same respect. As years went by and I started to become a young adult I remember my family and I went camping in Lone Pine California where we fished and gathered pine cones. Indeed these were times of pure excitement and enjoyment. After fishing a small creek I decided to walk off the beaten path and found an amazing discovery that was sure to grab my Grandmother’s attention.

The ground was littered in jet black obsidian core that cast a beautiful sheen from our campsite. When I found the obsidian I ran towards my Grandmother in pure excitement and thrill, shouting, “Look what I found.” “Look what I found.” My Grandmother walked up the road with me and discovered the obsidian I mentioned. As we examined the material she gathered a few core pieces and and started looking for chipped out arrowheads, knowing the Natives who once occupied the land used the same material we were walking amongst, for their arrows. Unfortunately, we did not find any points, but did have a great time collecting small obsidian core.
As time went on my Grandmother reached an age where she could no longer walk without help. However, the memories of running up the mountains and through the grass in search of obsidian will always remain with me. Although she was physically incapable of exploring, back in 2010 I expressed my interest in trying to create the arrows we used to see in the museums—she encouraged me to experiment, and so I did. The first arrows I made were absolutely horrible in appearance and in flight. After realizing I needed proper training I decided to take basic arrow making classes, dig deeper in research, and talk to my friends at the Malki Museum, in hopes of building a strong information base and putting in many hours of hard work. Soon enough I made five arrows, then twenty, then forty, and the number just kept growing to present day where I have a good amount of replicated arrows from many regions around the United States. Currently I feel confident enough to write this article on how I make traditional arrows with modern, and primitive tools. So lets dig in and please allow me to share with you what I have learned.
The first thing is shaft selection and proper seasoning of the arrow shafts. The majority of my arrows come from natural materials located in the mountains, foothills, and desert riparian of California. My preferred shaft materials are: Mulefat, Arrow-weed, Wild Rose, and Arundo. For the foreshaft I like to use Arrow-weed, Oak, Mahogany, and Creosote. One of my favorite combinations are Mulefat (shaft) and Arrow-weed (foreshaft). Both are very common in California. I first start by examining about thirty to forty shoots before selecting one. Here is a list of what I look for when gathering the perfect material:
1. Straight grain.
2. Free of twists and knots.
3. About thumb size—depending on the bow I am shooting it from.
4. Free of bug damage.
5. Long and straight.
Remember there is no such thing as perfectly straight material when it comes to the Desert and upper elevations, but if you can avoid the material with harsh bends, great! So look for material that has a nice gradual bend as it is much easier to straighten. Then after spotting the perfect material it is important to say a prayer and thank our creator and the plant for providing for us. At this point we can ethically harvest. I usually harvest twelve to sixteen shoots at once. I will take them home and rub animal fat all over the shaft and proceed to bundle them up. It is very important to use fat after gathering, especially in the desert. By doing so it slows down the drying time and helps prevent checking in the wood. And by bundling the shafts and foreshafts up it helps keep your material straight. Once you have completed this process the waiting game begins. Depending on climate you must allow the material to dry anywhere from three months to eight months.
Arrow shafts bundled and slowly drying.
Now that the shafts are dry it’s time to start a fire and begin to straighten the shafts. If they were bundled properly, this will not take long. Simply run the shaft through the low flame, heat the wood up and start bending the material until straight. Once the shaft is straight remove the bark and sight down the shaft (additional straightening might be required). I let the shaft cool down and proceed by sanding the shaft using: 80 grit, 150 grit, 100 grit, 250 grit, and 400 grit sandpaper. The shaft should feel and look smooth. At this point we are ready to process the shaft further.
The first thing I do is take a small chainsaw file and cut a groove in the top of the shaft; this is where the string will sit. I want a nice round profile and slightly tapered in towards the end of the string nock. After this is complete I want to drill a hole about two and one half inches deep for my foreshaft to sit in. I prefer to use hand tools—bone, and metal awls will do the job. When hollowing out the end of your shaft it is important to go very slow so you do not damage the shaft. Once you have the nock filed in and the end of the shaft hollowed out, I will take an abrasive stone and rough up the exterior section of the hollowed out shaft. Once that is complete, simply peel off thin strands of back-strap sinew, soak them in water for ten minutes and wrap the hollowed exterior with two layers of sinew. By doing so this will add strength to the shaft and help prevent the shaft from splitting when the arrow is fired. Now let it dry and we will begin to process the foreshaft.
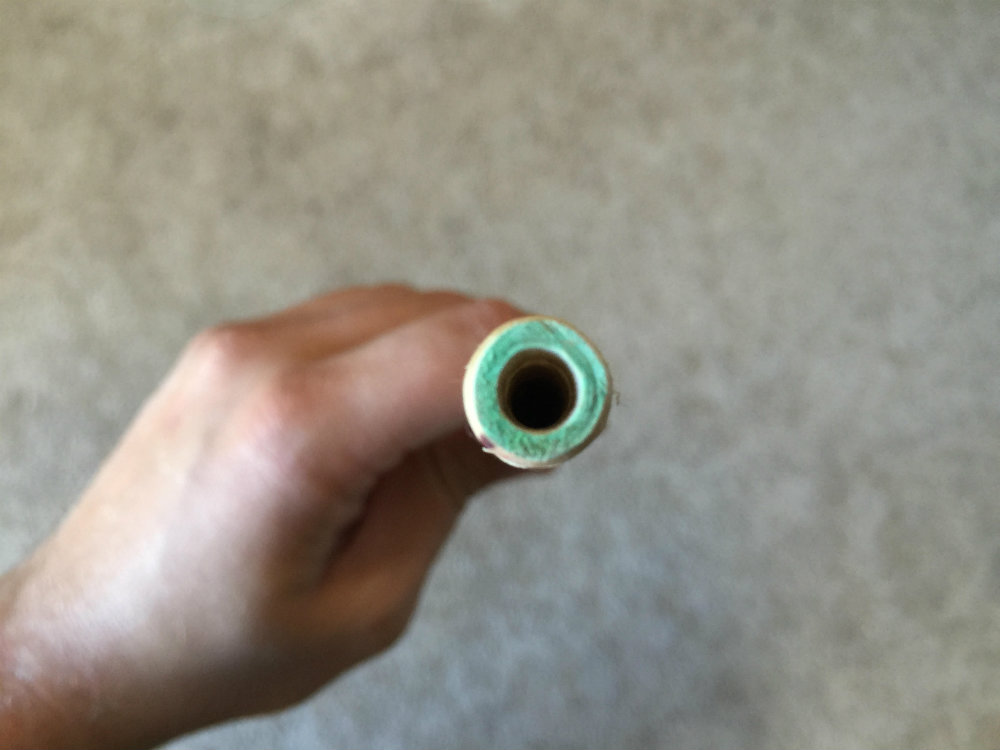
Hollowed shaft.
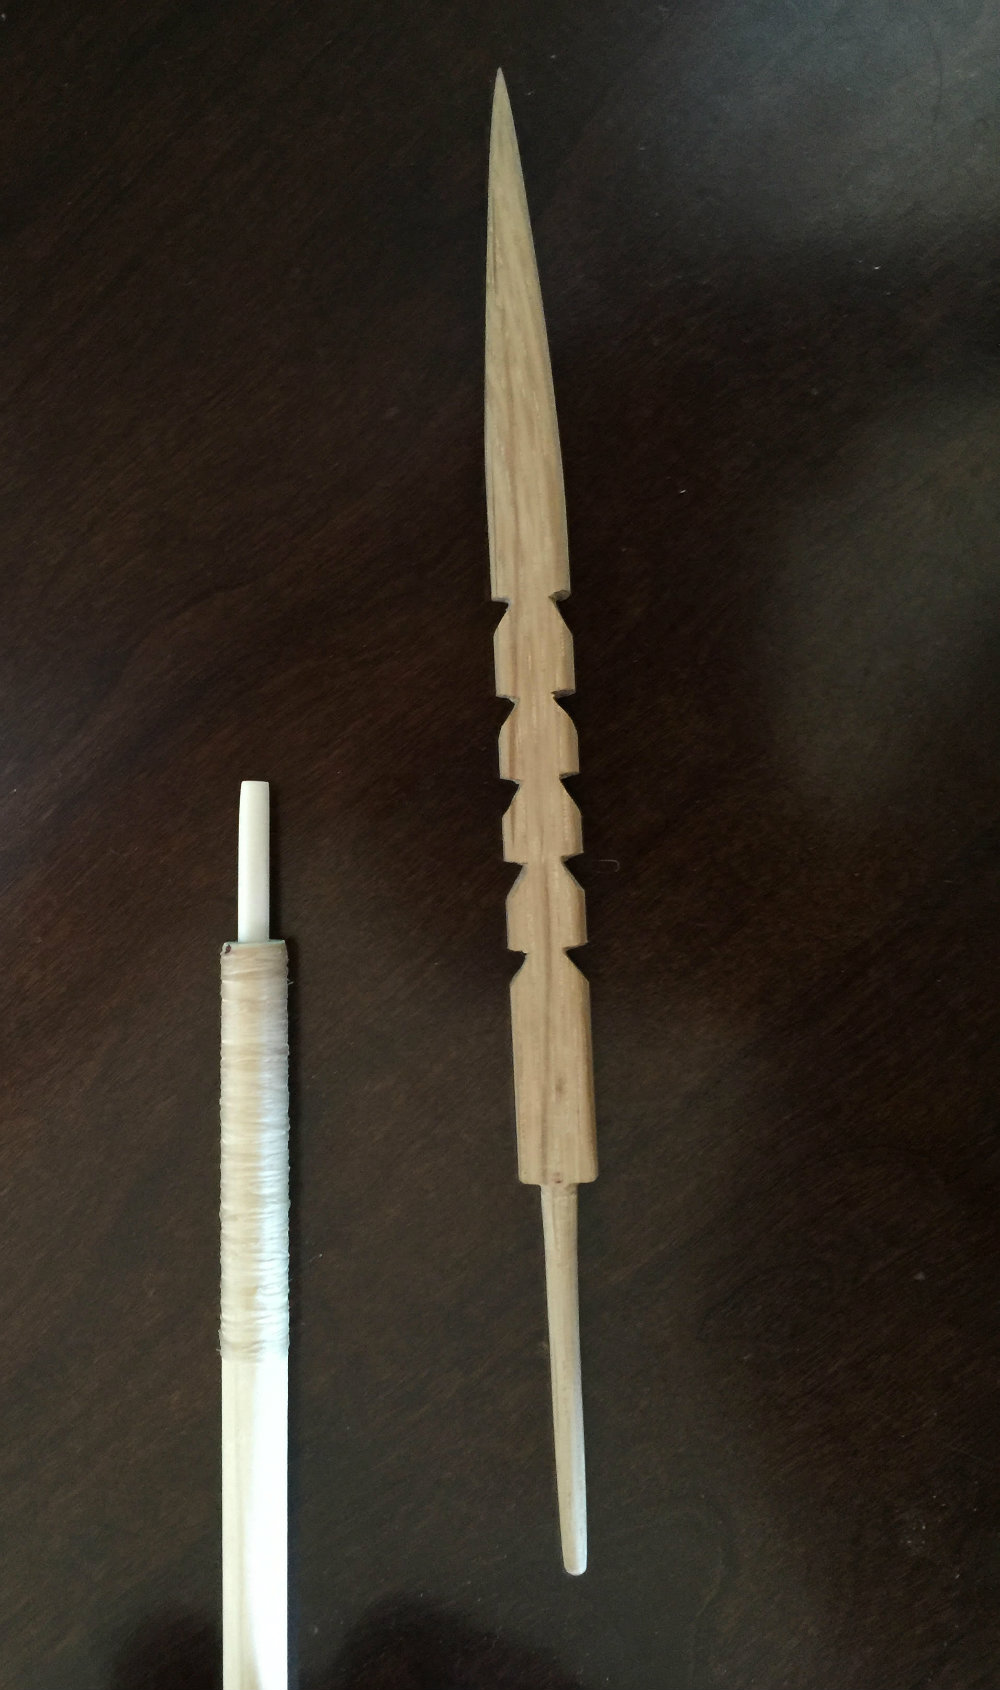
Just like the main shaft, one must make heat corrections, remove bark, and sand the material smooth. After doing this, it is important to figure out what kind of foreshaft you want to make. One might think every foreshaft should have a stone point, but the reality is, many alternative materials were used back in traditional times. Bone, sharks teeth, sting ray barbs, locust thorns, mesquite thorns, iron, and straight wood foreshafts were very common throughout Native America.
From top to bottom: wood tipped foreshaft, stone point, sharks tooth.
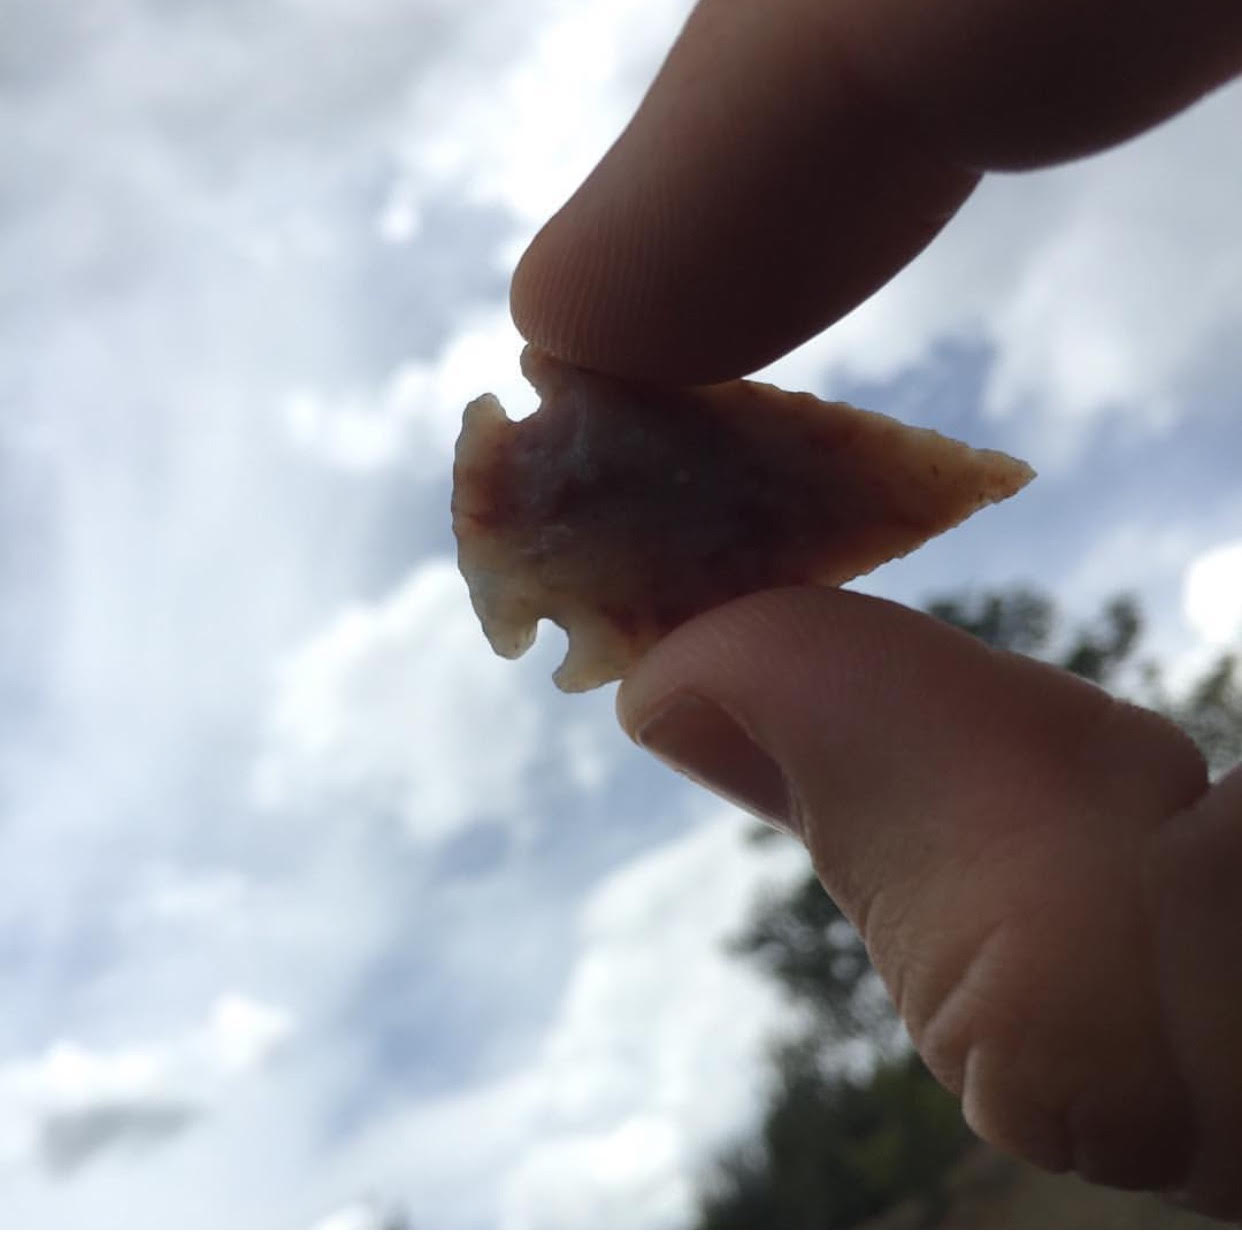
As a matter of fact in Native California stone was a luxury, so many Natives used hard wood foreshafts that were tapered to a point. When I make a foreshaft I spend great time and craft on its shape and material removal—I can’t express how important it is to work slow on this process. First start placing the tool (used to hollow out the shaft) inside the hollowed out portion of the main shaft and etch a light pencil mark at the end of the tool. Then by lining the end of the foreshaft up to the tool allows you to get a precise measurement for the “rat tail” section of the foreshaft. Now etch a circle around the foreshaft and begin by slowly removing wood. As you start shrinking down the diameter of the rat tail it is important to sand the tail smooth and check to see if it fits snug in the hollowed out section of the shaft. When I begin to sand, I will no longer use the blade of the tool to remove wood; using the spine of your knife will prevent overuse of wood removal. After the tail fits secure into the shaft sight down the arrow and make sure everything is straight—make adjustments as needed. Once this is complete you can choose to file in a groove (much like the nock) for a stone point, or you can carve an intricate design into the foreshaft and just taper the wood to a sharp point. If you decide to use a stone point, secure it in the groove with glue and wrap it with hydrated sinew.

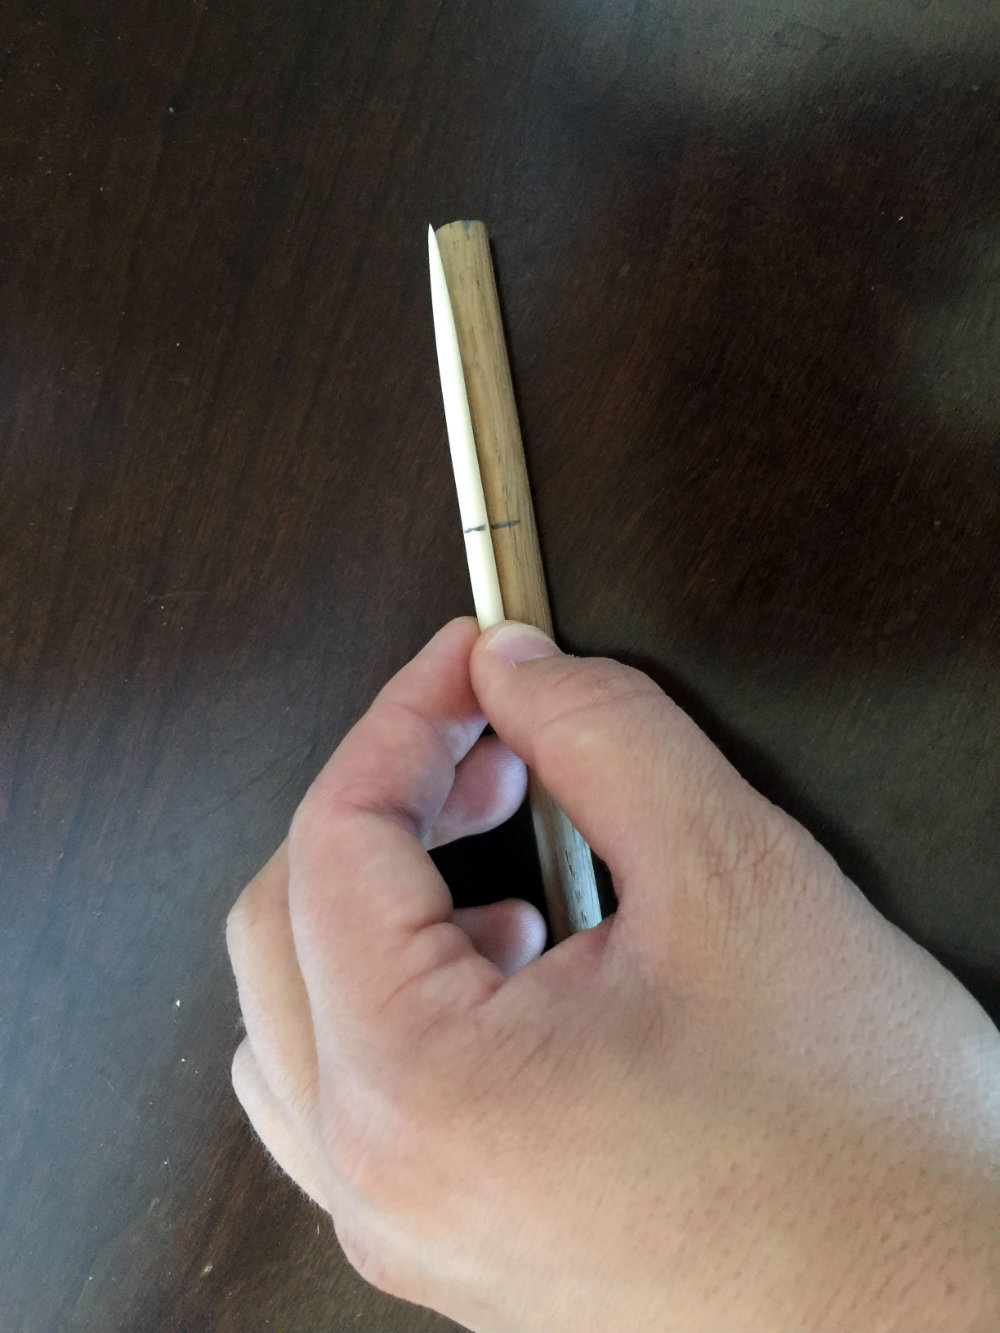
Using bone as a measurement guide.
At this point you are ready to begin the fletching process. This is the hardest part of the process and frustrates many beginners. However, once you practice this over and over, you begin to really grasp how it works and will catch onto little tricks that help you along the way. First you want to process the turkey feathers. All three feathers need to be either left wing or right wing. After choosing the feathers simply split the quill in half, remove the center pith with the tip of your knife, then proceed to trim the feathers even in length. Now place your knife or scissors at the end of the quill, towards the bottom (largest part of quill) and trim the feather back. Next do the same thing to the top and remember the thin part of the quill will point towards the top of the shaft’s nock end. Now trim the top of the feather, and align the other two feathers next to the one you already processed. By using the first feather as a cutting guide ensures all three feathers are cut symmetrical amongst each other. When this is complete you will need a few tools as listed below:
1. Thin pair of scissors.
2. Back-strap sinew.
3. White silk sewing thread.
4. Container of water.
5. Hide glue,
6. Sharpened stick.
7. Abrasive stone.
8. Pencil.
![]() You now have all the tools you need to complete the fletching process. Begin by laying one of the feathers on the shaft and etch a mark on each tip of the quill. Proceed by roughing up the shaft with the abrasive stone in-between the pencil marks where the feathers will be glued to. This allows the glue to bind on the shaft nice and secure. After roughing up the surface you can choose to paint your arrows or just leave them as is. I like to paint my arrows; especially the replicated ones, so I will use earth pigments and charcoal mixed with acrylic paint. When the pigment is dry soak the feathers and sinew in water for about three minutes—this will expand the quill and help keep the feather straight. Keep the sinew soaking, but remove the feathers from the water and simply shake them out to remove excess water and use your sharpened stick to apply a healthy amount of hide glue under the quill where you removed the pith. You can now remove a thin strand of sinew from the water and wrap it around the top pencil mark, thus binding it on itself so it does not slip. Then place one feather on the shaft—preferably parallel to the side of the top nock and keeping the tip of the quill on the tip of the pencil mark. I will wrap the sinew around once, then add a feather, and repeat the process until all three are evenly spaced and wrapped tight. Then you will want to remove another strand of sinew and wrap the bottom quill. This is much easier, but the important thing is making sure all the feathers are straight and there are not any large gaps in-between the feathers and the shaft. After securing all three feathers on the shaft, cut a long piece of silk sewing thread, and from the bottom sinew wrap, start by wrapping the silk thread around the fletching. Sometimes separating each feather is needed with this process. Although, tedious, it will not ruin the feather. When you reach the top, of the nock tuck the thread under itself and leave it to dry. I would also recommend wetting your fingers and straightening out the feathers after this process so as the fletchings dry they will be free of any gaps and imperfections. Also the nice thing about hide glue is it has a slow drying time, so if you need to make adjustments you can. It has been a few days and the glue is dry, you can now remove the thread. Again, go slow and be careful you do not tear at the feathers. It sure would be a shame putting all this work just to destroy the feathers. So patience is absolutely critical at this point. After you remove the thread your arrow is complete and you can either display it or use it in the field.
You now have all the tools you need to complete the fletching process. Begin by laying one of the feathers on the shaft and etch a mark on each tip of the quill. Proceed by roughing up the shaft with the abrasive stone in-between the pencil marks where the feathers will be glued to. This allows the glue to bind on the shaft nice and secure. After roughing up the surface you can choose to paint your arrows or just leave them as is. I like to paint my arrows; especially the replicated ones, so I will use earth pigments and charcoal mixed with acrylic paint. When the pigment is dry soak the feathers and sinew in water for about three minutes—this will expand the quill and help keep the feather straight. Keep the sinew soaking, but remove the feathers from the water and simply shake them out to remove excess water and use your sharpened stick to apply a healthy amount of hide glue under the quill where you removed the pith. You can now remove a thin strand of sinew from the water and wrap it around the top pencil mark, thus binding it on itself so it does not slip. Then place one feather on the shaft—preferably parallel to the side of the top nock and keeping the tip of the quill on the tip of the pencil mark. I will wrap the sinew around once, then add a feather, and repeat the process until all three are evenly spaced and wrapped tight. Then you will want to remove another strand of sinew and wrap the bottom quill. This is much easier, but the important thing is making sure all the feathers are straight and there are not any large gaps in-between the feathers and the shaft. After securing all three feathers on the shaft, cut a long piece of silk sewing thread, and from the bottom sinew wrap, start by wrapping the silk thread around the fletching. Sometimes separating each feather is needed with this process. Although, tedious, it will not ruin the feather. When you reach the top, of the nock tuck the thread under itself and leave it to dry. I would also recommend wetting your fingers and straightening out the feathers after this process so as the fletchings dry they will be free of any gaps and imperfections. Also the nice thing about hide glue is it has a slow drying time, so if you need to make adjustments you can. It has been a few days and the glue is dry, you can now remove the thread. Again, go slow and be careful you do not tear at the feathers. It sure would be a shame putting all this work just to destroy the feathers. So patience is absolutely critical at this point. After you remove the thread your arrow is complete and you can either display it or use it in the field.
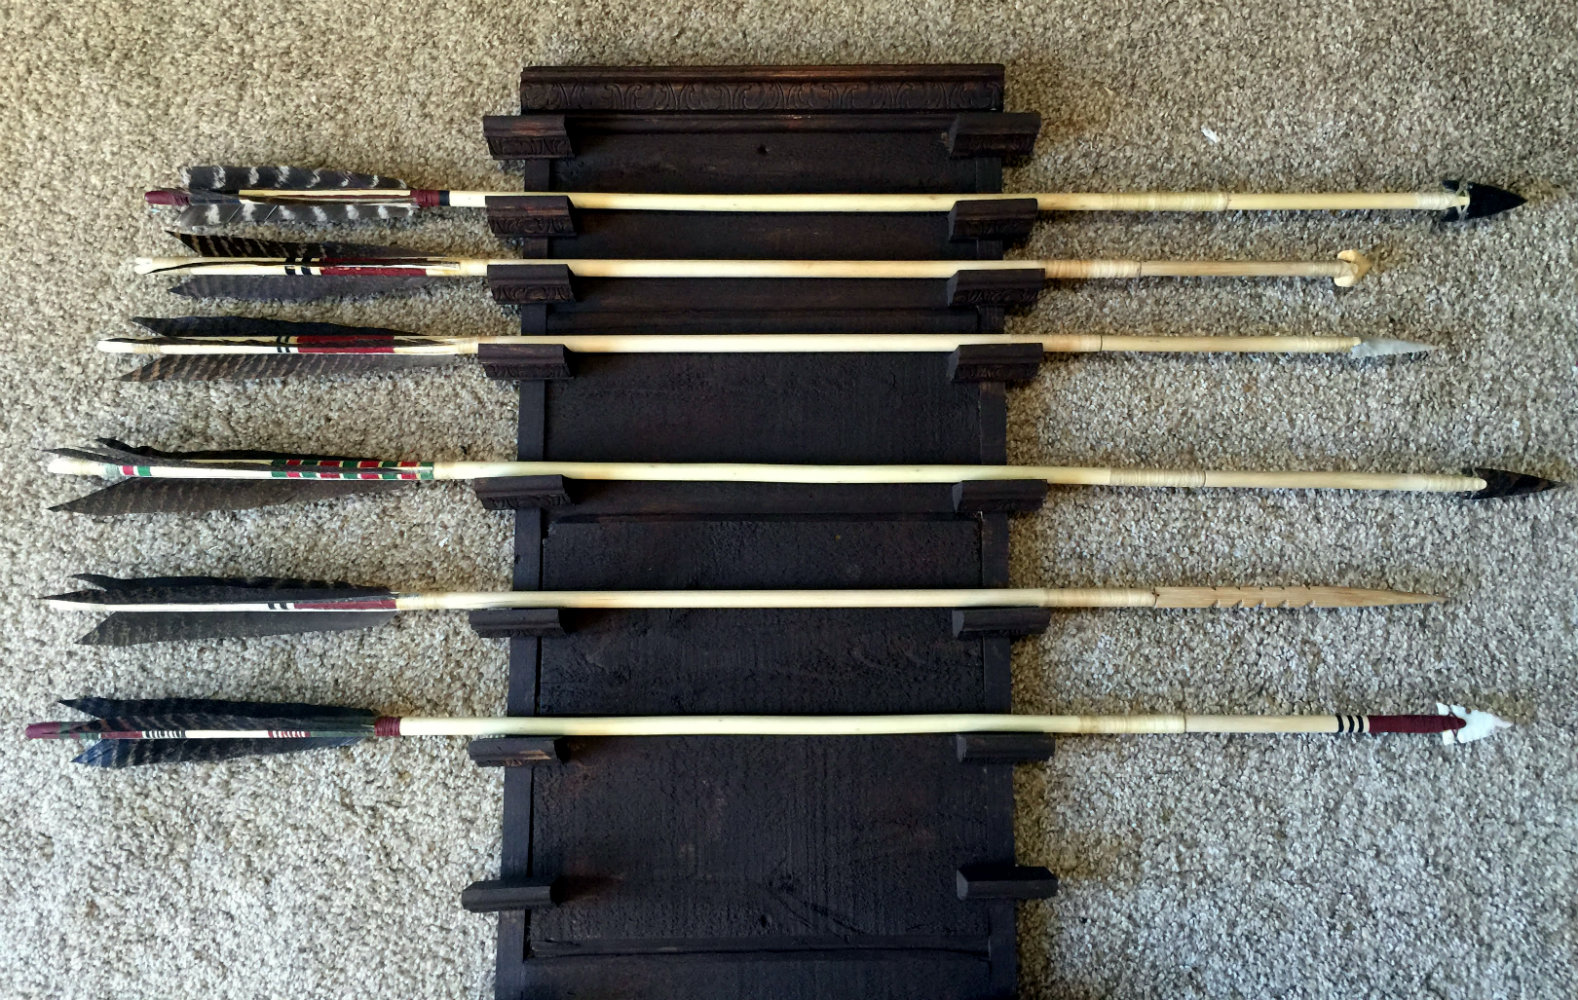
Completed arrows.
Finally, the important thing to remember and acknowledge are those who used this technology in order to better their people and lifestyle. To this day primitive skills are still alive amongst many Native people in America, but are hardly recognized in a world of self-fulfillment and self-pleasure. Furthermore, I must also acknowledge those who have taught me much over the years:
Aaron Saubel
Lorene Sisquoc
Daniel McCarthy
Tony Soares
Joe Dabill
Vince Pinto
Christopher Nyerges
Paul Campbell
Alan Halcon
John Campbell
Dude McLean
Jim Lowery
David Cooper
Malki Museum Staff
Ken Villars
Jim Robertson
John Lopez
Gary Gonzales
Rick Adams
Kathy Klopfenstein
David Holladay
and so much more!
 JEFF MARTIN: AS A YOUNG BOY JEFF ATTENDED BOY SCOUTS AND PRACTICED WILDERNESS LIVING SKILLS THROUGH HIGH SCHOOL. AFTER GRADUATION IN 2006 MARTIN BECAME AN AVID HIKER / OUTDOOR ENTHUSIAST IN SOUTHERN CALIFORNIA THEREFORE FURTHERING HIS EDUCATION AND TRAINING IN THE DESERT LANDSCAPE. AS MARTIN CONTINUED HIS STUDIES AND TRAINING IN PRIMITIVE LIVING SKILLS HE STARTED TRAINING AND WORKING WITH SOME OF AMERICAS BEST SURVIVAL AND TRADITIONAL SKILLS INSTRUCTORS. DURING HIS ADVANCEMENT IN TRADITIONAL, SKILLS MARTIN STARTED TEACHING BASIC AND ADVANCED DESERT SURVIVAL AT THE DESERT INSTITUTE, MALKI MUSEUM, AND OTHER VARIOUS ORGANIZATIONS. MARTIN IS RECOGNIZED BY SEVERAL NEWSPAPERS AND MAGAZINES. MARTIN ALSO HAS A YOUTUBE CHANNEL (PRIMITIVE LIFEWAYS) WHERE HE DEMONSTRATES AND TEACHES TRADITIONAL SKILLS, SURVIVAL SKILLS, REVIEWS OUTDOOR EQUIPMENT, AND MUCH MORE. MARTIN ENJOYS WORKING AND ATTENDING TRADITIONAL GATHERINGS WITH LOCAL NATIVE AMERICAN PEOPLES.
3 Responses to Arrow Making